 RfRemote 2.01RfRemote 2.01
Users guide
by
Keith Rubow
RfRemote lets you use Keith Rubow's RfRemote control system (or any other remote control system that interfaces through a serial port, or USB virtual serial port) to control any application, such as the SdPlayer music player for square dancing. Buttons on the remote control transmitter can easily be set up to generate simulated keystrokes to any application. Buttons may also be used to launch any file (same as double-clicking the file), or to execute other macros.
You can control your favorite media player. Use RfRemote to start and stop playback, control the volume, play the next/previous track, etc. all from the comfort of your favorite chair, or even from the next room. You can control a slide presentation, changing slides forward or back with a click of a button on the remote control. Your imagination is your only limit.
Sorry, but there is no Windows version of RfRemote 2.01 yet. For now you must use RfRemote version 1.00 for Windows.
RfRemote is distributed as a Debian package file called rfremote_v.vv_i386.deb, where v.vv is the program version number. Simply double-click the package file to install it, or open the package file with your package manager. The RfRemote software is installed in /usr/share/rfremote. A script file to launch RfRemote is installed in /usr/bin. The initial default configuration "ini" file is installed in /usr/share/xdg/krubow, and any user configuration settings are saved in ~/.config/krubow. An application menu entry is automatically created, typically under Sound and Video (or something similar), because RfRemote is used mostly for controling media players. Your package manager will automatically install the required Qt runtime libraries if these are not already installed on your system. Source files are available as a zip file called RfRemotevvv.zip.
RfRemote may be installed using your package manager.
The main SdPlayer window appears as shown: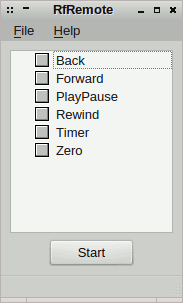
The title bar has the name of the application.
The menu bar gives access to the File and Help menus (described in detail below).
The macro list shows a list of all defined macros.
The Start (or Stop) button is used to activate and deactivate the remote control software.
You can click-and-drag the Resize handle in the lower-right corner of the window (or drag the edges of the window) to resize the main window.
The file menu contains the folowing entries:
The help menu contains the following entries:
The Popup menu is accessed by right-clicking in the Macro display area of the main screen. This menu contains the following commands for working with Macros:
Before RfRemote can be used, some setup and configuration must be done. If you are using RfRemote to control the SdPlayer program, most of this work has already been done for you, since RfRemote comes pre-configured with a set of macros for controlling SdPlayer. However, there are still a few thing to do, and some things you may want to customize based on your preferences.
The setting dialog box is accessed from the File->Settings... menu. This
opens the setting dialog box, which appears as follows: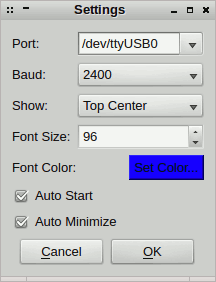
Port is used to select which serial port is used by the RfRemote Control system. This is usually one of the ttyUSBx ports (probably ttyUSB0 if there are no other serial devices on your system). If you do not have the correct serial port selected, you will get an error when you try to Start the remote control software.
Baud selects the baud rate used by your remote control device. This is usually 2400 baud, which is the baud rate used by my RF Remote Control System.
Show is used to select the position on the screen where the name of the currently executing macro is displayed in a pop up window. This can be set to None, Top-Left, Top-Center, Top-Right, Middle-Left, Middle-Center, Middle-Right, Bottom-Left, Bottom-Center or Bottom-Right. This display pops up on the screen for a few seconds when a macro is executed, and is used as visual comfirmation that the button was pressed. Setting it to None disables the display.
Font Size selects the size of the text for displaying the name of the currently executing macro in the pop up window.
Font Color selects the color of the text for displaying the name of the currently executing macro in the pop up window. The background color is always white.
Auto Start and Auto Minimize select what the application does when it is first launched. If Auto Start is checked, RfRemote will automatically be activated (as if the Start button was pressed). If Auto Minimize is checked, RfRemote will automatically be minimized when it starts. It is usually a good idea to check both of these boxes after you have confirmed that all of your macros are working properly.
To define macros,
use the Add Global Macro, Add Group, or Add Member Macro commands from the
popup menu. This brings up the Edit Macro dialog box, which appears as
follows: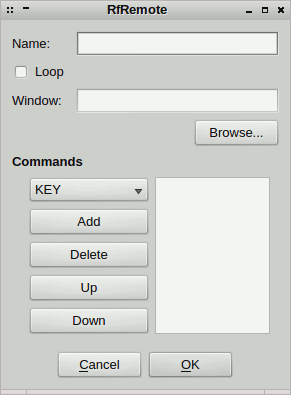
Enter a descriptive name for the macro, but don't make it too long or it may not fit in the popup window that displays the name of the macro that is being executed. The name is the only thing you need to enter for Group macros. Global and Member macros require additional information.
Loop mode is used to determine how the commands assigned to this macro are executed. If Loop mode is not set, the entire list of commands will be executed each time the macro is executed. If Loop mode is set, then only one command is executed each time the macro is executed. The first time the macro is executed the first command will be executed. The second time the macro is executed the second command will be executed, etc. After the last command is executed, execution resumes with the first command again. This can be useful for executing a series of steps with only one button on the remote control.
 Window determines
which application will receive any KEY commands. To select the application, it
must be running (and not minimized) when you define the macro. Click the
Browse... button to see a list of currently running applications, and select it
from the list. The application can be identified by either its Title, or its
Class. If the Title changes, for example when the application opens different
files, then it is best to use the Class name to identify the application. Some
applications may appear in the list of target windows several times, with the
same Title and/or Class, even if only one instance of the application is
running. Typically only one of these windows is able to receive the KEY
commands from RfRemote. The proper window must be selected, or the KEY commands
will not function properly. This is the purpose of the number that follows each
Title and each Class. The number identifies the window in the list, 0 for the
first window, 1 for the second, 2 for the third, etc. When you select a window
from the list, the number is appended to the beginning of the Title or Class,
followed by a T if the window was selected by Title, or a C if the window was
selected by class. For example, the window is identified as 2CSdPlayer to
select the third window with a Class of SdPlayer, or 1TSdPlayer to select the
second window with a Title of SdPlayer. You can also type the window Title or
Class name to use, but be sure to enter the number followed by T or C before
the Title of Class name.
Window determines
which application will receive any KEY commands. To select the application, it
must be running (and not minimized) when you define the macro. Click the
Browse... button to see a list of currently running applications, and select it
from the list. The application can be identified by either its Title, or its
Class. If the Title changes, for example when the application opens different
files, then it is best to use the Class name to identify the application. Some
applications may appear in the list of target windows several times, with the
same Title and/or Class, even if only one instance of the application is
running. Typically only one of these windows is able to receive the KEY
commands from RfRemote. The proper window must be selected, or the KEY commands
will not function properly. This is the purpose of the number that follows each
Title and each Class. The number identifies the window in the list, 0 for the
first window, 1 for the second, 2 for the third, etc. When you select a window
from the list, the number is appended to the beginning of the Title or Class,
followed by a T if the window was selected by Title, or a C if the window was
selected by class. For example, the window is identified as 2CSdPlayer to
select the third window with a Class of SdPlayer, or 1TSdPlayer to select the
second window with a Title of SdPlayer. You can also type the window Title or
Class name to use, but be sure to enter the number followed by T or C before
the Title of Class name.
The Commands area of the dialog box is used to define commands assigned to the macro. The drop down list selects the type of command to add. Commands may be KEY (to simulate a keystroke), MACRO (to execute another macro) or LAUNCH FILE. (to launch any application or file, just like double-clicking it in your file browser). MOUSE CLICK is not currently implemented. Commands are what make your remote control buttons actually do something useful. Commands are described in detail below.
The Delete button deletes the currently selected command.
The Up and Down buttons will move the currently selected command up or down in the list of commands, to rearrange the order of commands.
To define a KEY command, select KEY from the dropdown list and click Add.
This opens the Add Keystroke dialog box, which appears as follows:
In the Add Keystroke dialog box, select the desired key from the dropdown list. All keys are listed, including function keys, arrow keys, ENTER, SPACE, numeric keypad keys, and special keys like HOME and END. Note that these are keys, and not characters. Any key can be combined with any combination of Alt, Ctrl and Shift by checking the boxes. Note that to generate a upper case letter, you must check Shift. To generate an asterisk, use key 8 with Shift. To generate a colon use key ";" with shift.
To define a LAUNCH FILE command, select LAUNCH FILE from the drop down list and click Add. This opens a standard File Open dialog box to let you select the file you want to launch. This will be the same as double-clicking the file in your file browser. Launching an executable file starts the application. Launching a document file will open the file with the associated application.
To define a MACRO command, select MACRO from the drop down list and click
Add. This opens the Add Macro dialog box, which appears as follows: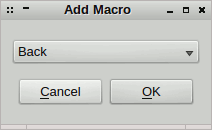
You may select any macro from the list to execute as a command. The list of macros will include all Global macros, all Group macros, but only the Member macros that are in the same group as the macro you are defining.
Executing a Group macro has the effect of activating that group of macros. The same button on the remote may be assigned (by Learning) to as many different macros as you want, as long as the macros are in different groups. By activating the desired group you can change the function of one or more buttons on the remote. This allows you to have many more functions than there are buttons on the remote. A convenient way to select the active group is to use a single button assigned to a Global macro. This Global macro can be set to Loop mode, and execute a series of MACRO commands to activate the desired Group macros is sequence. Pressing the button on the remote cycles through all the groups is sequence.
After defining the macros, and the commands to be executed by the macros, it
is necessary to teach the software which button on the remote control
transmitter to use for each macro. This is done by using the Learn command on
the Popup menu. Each Global macro must "Learn" a different button. The button
"Learned" by each Member macro must be different from any other Member macro in
the same group, and different from any Global macro. However, a Member macro in
one group can use the same button as a Member macro in a different group. This
is one way we can get one button to be used for more than one function. Right
click on any Global or Member macro and select the Learn command from the Popup
menu. This opens the Learn dialog box, which appears as follows:
The Learn window will show you which macro is being learned. Simply press the button you want to use for this macro, and the received data will be shown in hexadecimal in the Learn window. Click OK to accept this data. The red question mark (indicating an unlearned macro) should disappear from the icon for the macro which has been learned. Note that if you know the data generated by the button, you may simply type it (in hexadecimal) instead of pushing the button.
Hint: If you "Learn" a macro and click OK without pushing any button on the remote (or without entering any data), you will REMOVE the learned button from the macro. The red question mark will appear, indicating the macro has not been learned, and is not assigned to any button.
After launching RfRemote, simply click the Start button on the main screen to activate the software. It is best to minimize the RfRemote window when it is active so the window is not in the way of other applications on your desktop. This is conveniently done for you if the Auto Minimize feature is enabled under Settings. The Auto Start feature makes it unnecessary to click the Start button when RfRemote is launched. If the selected serial port cannot be opened, RfRemote will not be activated. This could be caused by having the wrong serial port selected, or by having another application running which has opened the serial port.
If you have defined a Global macro named StartUp, this macro will be executed automatically each time RfRemote is started. The StartUp macro could, for example, execute a Group macro to make it the default active group at startup. The StartUp macro could also launch one or more other applications, such as SdPlayer, which you will control using RfRemote.
Clicking the Stop button on the main screen will stop the remote control functions.
By right clicking any macro and selecting Edit from the Popup menu, you can open the Edit window. This is the same window which is used to create new macros. Any property of the macro may be changed using the Edit window. You can change the name of the macro, the target window used by the macro, the Loop mode, and the assigned commands. Simply click OK to save the changes.
To delete a macro, right click it and select Delete from the Popup menu.
The simplest way to use RfRemote is to just create one Global macro for each button on the remote control transmitter. But we can do much more with our remote control by using Group and Member macros.
Group macros simply act like folders to hold a collection of Member macros. This allows us to organize many macros into functional groups. Only one of the Group macros can be "active" at a time. A Group macro is activated by executing it, either by right clicking on it and choosing Execute Macro from the Popup menu, or by executing it using a Macro command from another macro. One way to do this is to create a Global macro for each Group macro, and assign a separate button on the remote control transmitter to each one. Each of these Global macros has a single command to execute a Macro, namely the Group macro to activate. In this way one button on the remote can enable a set of functions (the Member macros of the selected Group), which can be assigned to a set of buttons on the remote. Another macro Group can use different Member macros for a different set of functions assigned to the same buttons on the remote. This is typical of how many remote controls use a button to select TV, VCR, or DVD and then use a set of common buttons for different functions depending on which device was selected.
We can also use a single button on the remote to cycle through a list of two or more macro groups by using the "Loop" feature below. This can be awkward if there are many Group macros, but works well if there are only two or three groups. Using the Show feature to indicate which Group has been selected works very well.
Normally a Macro with more than one Command defined will execute all the commands in sequence when the macro is executed. However, when the Loop mode is enabled for the macro, only one command is executed each time the macro is executed. This can be used for stepping through any predefined set of actions. It also works exceptionally well for activating a series of Group macros using a single button on the remote. For example, suppose we have three Group macros named AUDIO, VIDEO, and SLIDESHOW. Simply create a Global macro named SELECT, and define three commands, MACRO AUDIO, MACRO VIDEO, and MACRO SLIDESHOW. Enable Loop mode for the SELECT macro and assign it to a button on the remote. The first time you push the Select button the AUDIO group will be activated. The next time the VIDEO group will be activated. The next time the SLIDESHOW group will be activated. The next time the AUDIO group will be activated, etc.
Once a set of macros have been defined, and they are working well, it would be convenient to save them to a file. This is done using the Export Macros command on the File menu. Simply select any folder and filename, and the current macro definitions will be written to your file with a ".ini" file type. The exported macros can be read back in to RfRemote using the Import Macros command. This allows you to create different sets of macros for use with different applications. When you launch RfRemote, it will always use the most recent set of macros which had been defined or imported.
When using multiple macro Groups, you can easily make any Group the default at startup. Simply create a Global Macro named StartUp. This macro will be automatically executed each time RfRemote is started. Create a MACRO command in the StartUp macro that executes the desired default Group macro. Executing a Group macro makes it the currently active group.
When you define a macro that will generate keystrokes to a window, make sure the desired target application window is open (and not minimized) when you define the macro. This will allow you to pick the target window from a list. If the application is not running, or is minimized, it will not appear in the list of open windows.
RfRemote uses the Title or Class name to identify the target window. If you have two copies of the application running, RfRemote needs to know which window should receive keystrokes. The number following the Title or Class in the Target Window dialog box can identify which window should receive the KEY commands.
A macro can generate keystrokes to only one window. If you need a single macro to generate keystrokes to more than one window, there is a simple way to do it. Create a separate macro for the keystrokes to each window. Then create another macro that executes each of the previous macros as MACRO commands. In this way a single macro can control many different windows.
Keep your macro names meaningful. Names like Next and Previous are better than names like Button1 and Button2. If you use the Show feature to display the name of the executing macro on the screen, make sure you keep the macro names short enough to fit on the screen.
If you use RfRemote for different purposes at different times, use Export Macros to save a set of macros useful for one purpose so you can use Import Macros to retrieve that set of macros again later.